# 4.2- L'import du catalogue

#### **4.2.1- Importer un catalogue**

<span style="color: rgb(0, 0, 0);">Pour importer votre catalogue allez sur le module**<span style="color: rgb(24, 139, 175);"> Gestion des prix</span>** via le menu du haut de votre Dolibarr, puis sur le menu de gauche cliquez sur le menu <span style="color: rgb(24, 139, 175);">**Importer un catalogue**</span>.</span>

<p class="callout info"><span style="color: rgb(0, 0, 0);">**<span style="color: rgb(24, 139, 175);">Note :</span>** Lors des étapes de l'import veuillez retenir que **<span style="color: rgb(24, 139, 175);">le choix du fournisseur</span>** et/ou </span>de la<span style="color: rgb(0, 0, 0);">**<span style="color: rgb(24, 139, 175);"> catégorie produit</span><span style="color: rgb(24, 139, 175);">s </span>**</span>ne sert **que** si vous importez le catalogue d'un seul fournisseur et ou d'une seule catégorie produit.  
Si vous avez plusieurs fournisseurs ou plusieurs catégories à importer, vous laisserez le ou les champs correspondant vides et vous devrez avoir les champs code fournisseur et ou catégorie renseignée dans votre fichier source.</p>

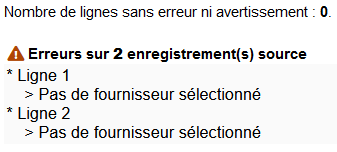
<p class="callout warning"><span style="color: rgb(0, 0, 0);">**<span style="color: rgb(186, 55, 42);">Le fournisseur doit impérativement être renseigné</span>** soit dans le fichier d’import soit lors de l'étape 1,2 et 3, sans quoi l'import échouera. **<span style="color: rgb(24, 139, 175);">La catégorie</span>** produit <span style="color: rgb(24, 139, 175);">**n'est pas obligatoire**</span> pour réaliser l'import.</span></p>

##### **<span style="color: rgb(0, 0, 0);">Étape 1 : </span>**<span style="color: rgb(0, 0, 0);">Choix du fichier d'import</span>

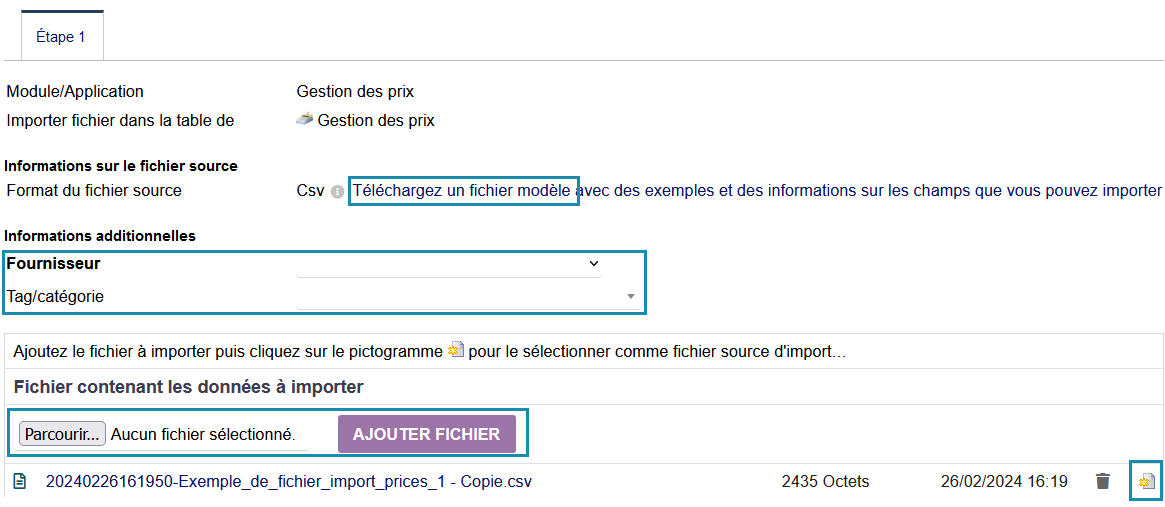
<span style="color: rgb(0, 0, 0);">Cette première étape vous permet de <span style="color: rgb(24, 139, 175);">**choisir votre fichier d'import**</span> et éventuellement d'**<span style="color: rgb(24, 139, 175);">indiquer à quel fournisseur et quelle catégorie produit</span>** vont être attribuée les produits importés. </span>

<span style="color: rgb(0, 0, 0);">**<span style="color: rgb(24, 139, 175);">Le choix du fournisseur et de la catégorie</span>** est </span><span style="color: rgb(0, 0, 0);">optionnel et <span style="color: rgb(24, 139, 175);">**est utile** </span></span><span style="color: rgb(0, 0, 0);"><span style="color: rgb(24, 139, 175);">**si vous importez un catalogue de produits correspondant à un seul fournisseur, et / ou une seule catégorie**</span> de produits. Si ce n'est pas le cas, ne renseignez rien ici.</span>

<span style="color: rgb(0, 0, 0);">Sur cette étape vous aurez la possibilité de voir tous les fichiers CSV que vous importerez sous forme de liste au fur et à mesure que vous réaliserez des imports.  
</span>

<span style="color: rgb(0, 0, 0);">Vous avez également la possibilité de télécharger un exemple de fichier CSV à importer.</span>

<span style="color: rgb(0, 0, 0);">Une fois votre fichier CSV ajoutée cliquez sur cette icône </span>[![image.png](https://doc.altairis.fr/uploads/images/gallery/2024-02/scaled-1680-/R2Eimage.png)](https://doc.altairis.fr/uploads/images/gallery/2024-02/R2Eimage.png)<span style="color: rgb(0, 0, 0);"> pour **<span style="color: rgb(24, 139, 175);">passer à l'étape 2</span>**.</span>

[![etape 1 - Copie.png](https://doc.altairis.fr/uploads/images/gallery/2024-02/scaled-1680-/etape-1-copie.png)](https://doc.altairis.fr/uploads/images/gallery/2024-02/etape-1-copie.png)

##### **<span style="color: rgb(0, 0, 0);">Étape 2 : </span>**<span style="color: rgb(0, 0, 0);">Correspondance des champs</span>

##### <span style="color: rgb(0, 0, 0);">Séparateur, délimiteur de champs</span>

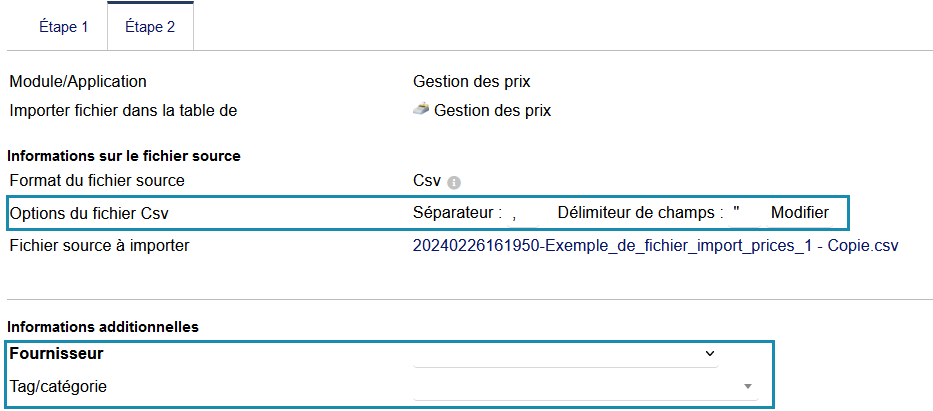
<span style="color: rgb(0, 0, 0);">Sur cette étape <span style="color: rgb(24, 139, 175);">**vous pouvez choisir de garder ou de modifier le séparateur et le délimiteur de champs,** <span style="color: rgb(0, 0, 0);">cliquez sur <span style="color: rgb(24, 139, 175);">**modifier si vous le ou les changez**</span></span></span>.   
Vous pouvez également </span><span style="color: rgb(0, 0, 0);">indiquer un fournisseur et une catégorie produit, le choix que vous aurez fait à l'étape 1 sera ici sauvegardé et donc affiché. </span>

[![etape 2 - A - Copie.png](https://doc.altairis.fr/uploads/images/gallery/2024-02/scaled-1680-/etape-2-a-copie.png)](https://doc.altairis.fr/uploads/images/gallery/2024-02/etape-2-a-copie.png)

##### <span style="color: rgb(0, 0, 0);">Choix profil d'import </span>

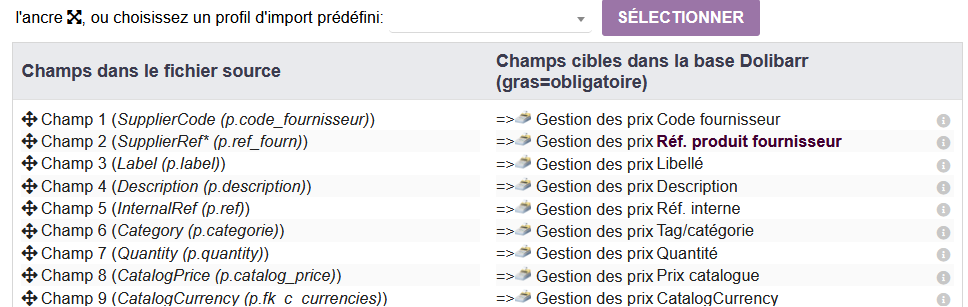
<span style="color: rgb(0, 0, 0);">Vous**<span style="color: rgb(24, 139, 175);"> pouvez choisir un profil d'import prédéfini</span>** que vous aurez **<span style="color: rgb(24, 139, 175);">réalisé en amont de cet import</span>**.   
</span>

[![etape 2 - B - Copie.png](https://doc.altairis.fr/uploads/images/gallery/2024-02/scaled-1680-/etape-2-b-copie.png)](https://doc.altairis.fr/uploads/images/gallery/2024-02/etape-2-b-copie.png)

##### <span style="color: rgb(0, 0, 0);">Sauvegarder le profil d'import</span>

<span style="color: rgb(0, 0, 0);">À la fin de cette page <span style="color: rgb(24, 139, 175);">**il vous sera possible de sauvegarder ce profil d'import**</span> pour pouvoir le réutiliser plus rapidement les prochaines fois que vous ferez un import similaire. Indiquer le nom que vous souhaitez donner au profil et sauvegardez-le.</span>

[![image.png](https://doc.altairis.fr/uploads/images/gallery/2024-02/scaled-1680-/MXJimage.png)](https://doc.altairis.fr/uploads/images/gallery/2024-02/MXJimage.png)

##### <span style="color: rgb(0, 0, 0);"><span style="color: rgb(186, 55, 42);"><span style="color: rgb(0, 0, 0);">Correspondance des champs</span></span></span>

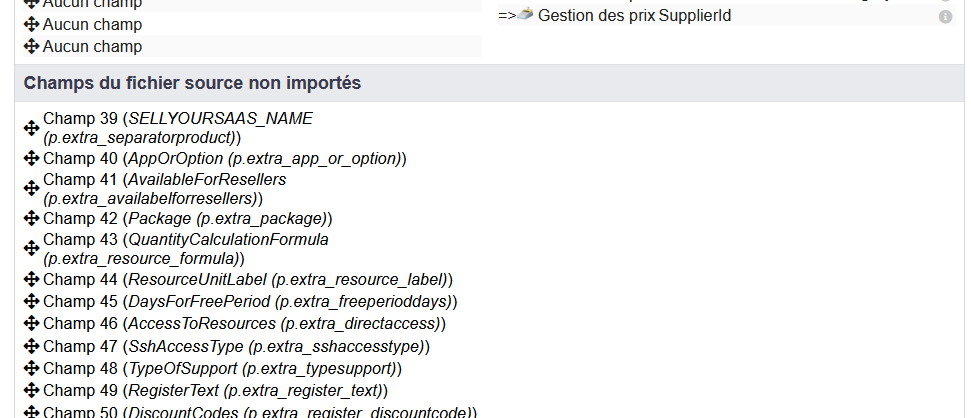
<span style="color: rgb(0, 0, 0);">**<span style="color: rgb(186, 55, 42);">Le plus important</span>** à cette étape est <span style="color: rgb(24, 139, 175);">**le choix des correspondances entre vos champs et ceux de Dolibarr**</span>, avec <span style="color: rgb(24, 139, 175);">**une première zone**</span> (Champs dans le fichier source) **<span style="color: rgb(24, 139, 175);">pour les champs que vous souhaitez importer</span>** et une <span style="color: rgb(24, 139, 175);">**deuxième zone**</span>  (Champs du fichier source non importés) en dessous **<span style="color: rgb(24, 139, 175);">avec les champs que vous ne souhaitez pas importer</span>**.</span>

<span style="color: rgb(0, 0, 0);">Dans un premier temps vous pouvez exclure des champs que vous ne souhaitez pas importer et ensuite vérifier que les champs que vous gardez correspondent bien aux champs cibles de Dolibarr se trouvant en face à droite.</span>

<span style="color: rgb(0, 0, 0);">Déplacer les champs en vous positionnant sur cette icône </span>![image.png](https://doc.altairis.fr/uploads/images/gallery/2024-02/scaled-1680-/IAiimage.png) <span style="color: rgb(0, 0, 0);">système de drag &amp; drop</span>

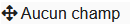
<span style="color: rgb(0, 0, 0);">**<span style="color: rgb(24, 139, 175);">Les champs qui ne seront plus</span>** dans la liste des **<span style="color: rgb(24, 139, 175);">Champs dans le fichier source</span>**, car vous **<span style="color: rgb(24, 139, 175);">les aurez mis </span>**dans la liste des<span style="color: rgb(24, 139, 175);"> **Champs du fichier source non importés**</span> seront **<span style="color: rgb(24, 139, 175);">marqués comme ceci </span>**</span>[![image.png](https://doc.altairis.fr/uploads/images/gallery/2024-02/scaled-1680-/eytimage.png)](https://doc.altairis.fr/uploads/images/gallery/2024-02/eytimage.png)

<p class="callout info"><span style="color: rgb(0, 0, 0);">**<span style="color: rgb(24, 139, 175);"><span style="color: rgb(0, 0, 0);"><span style="color: rgb(24, 139, 175);">Note :</span></span> </span>**</span>**Si la mention "Aucun champ" ne s'est mise par défaut**<span style="color: rgb(0, 0, 0);"> est décale donc vos champs à importer par rapport aux champs cible de Dolibarr, veuillez mettre manuellement [![image.png](https://doc.altairis.fr/uploads/images/gallery/2024-02/scaled-1680-/eytimage.png)](https://doc.altairis.fr/uploads/images/gallery/2024-02/eytimage.png)en allant le prendre à la fin de votre liste de champs non importés.</span></p>
<div class="page-content clearfix" component="page-display" id="bkmrk-exemple-champs-dans-" option:page-display:page-id="146"><div dir="auto"><table border="1" id="bkmrk-exemple-champs-dans--1" style="border-collapse: collapse; width: 100%; height: 262.2px;"><colgroup><col style="width: 50.0484%;"></col><col style="width: 50.0484%;"></col></colgroup><tbody><tr style="height: 29.5833px;"><td class="align-center" colspan="2" style="background-color: rgb(236, 240, 241); vertical-align: middle; height: 29.5833px;">**<span style="color: rgb(0, 0, 0);">Exemple</span><span style="color: rgb(0, 0, 0);">  
</span>**</td></tr><tr style="height: 46.3833px;"><td style="background-color: rgb(236, 240, 241); height: 46.3833px;">**<span style="color: rgb(0, 0, 0);">Champs dans le fichier source <span style="color: rgb(24, 139, 175);">à importés</span></span><span style="color: rgb(0, 0, 0);"><span style="color: rgb(24, 139, 175);"> </span><span style="color: rgb(24, 139, 175);"><span style="color: rgb(0, 0, 0);">et les </span></span></span><span style="color: rgb(0, 0, 0);"><span style="color: rgb(24, 139, 175);">champs cibles</span>  
</span>**</td><td style="background-color: rgb(236, 240, 241); height: 46.3833px;">**<span style="color: rgb(0, 0, 0);">Champs du fichier source <span style="color: rgb(24, 139, 175);">non importés</span></span>**</td></tr><tr style="height: 186.233px;"><td style="height: 186.233px;">[![etape 2 - D.png](https://doc.altairis.fr/uploads/images/gallery/2024-02/scaled-1680-/etape-2-d.png)](https://doc.altairis.fr/uploads/images/gallery/2024-02/etape-2-d.png)  
</td><td style="height: 186.233px;">[![etape 2 -D.png](https://doc.altairis.fr/uploads/images/gallery/2024-02/scaled-1680-/0jnetape-2-d.png)](https://doc.altairis.fr/uploads/images/gallery/2024-02/0jnetape-2-d.png)

</td></tr></tbody></table>

</div></div><span style="color: rgb(0, 0, 0);">Pour finir cette étape cliquez sur <span style="color: rgb(24, 139, 175);">**Étape suivante**</span>.</span>

<p class="callout info"><span style="color: rgb(186, 55, 42);"><span style="color: rgb(0, 0, 0);">**<span style="color: rgb(24, 139, 175);">Note :</span>** C'est un outil de mémorisation de cette correspondance de champs qui vous permettra de ne pas refaire le travail de mise en correspondance des champs à chaque fois que vous ferez un import basé sur le même type de fichier (c'est à dire avec les mêmes champs, dans le même ordre, quel que soit le contenu).</span>  
</span></p>

##### <span style="color: rgb(0, 0, 0);">**Étape 3 :** Test et import  
</span>

<span style="color: rgb(0, 0, 0);">Sur cette étape <span style="color: rgb(24, 139, 175);"><span style="color: rgb(0, 0, 0);">vous avez</span>**<span style="color: rgb(0, 0, 0);"> </span>toujours la possibilité de définir** <span style="color: rgb(0, 0, 0);">un </span>**fournisseur** <span style="color: rgb(0, 0, 0);">et une</span> **catégorie produits** <span style="color: rgb(0, 0, 0);">si cela n'a pas était fait en amont,</span> <span style="color: rgb(0, 0, 0);">vous pouvez laisser ces deux champs vide, si du moins le fournisseur est indiqué dans votre fichier d'import.</span>  
</span></span>

<span style="color: rgb(0, 0, 0);"><span style="color: rgb(24, 139, 175);"><span style="color: rgb(0, 0, 0);">Vous avez aussi **<span style="color: rgb(24, 139, 175);">la possibilité de choisir de ne pas importer la première ligne de votre fichier CSV</span>**<span style="color: rgb(24, 139, 175);"><span style="color: rgb(0, 0, 0);">,</span></span> s'il contient des entêtes de colonne. Cela évitera que l'import ne prenne les <span style="color: rgb(24, 139, 175);"><span style="color: rgb(0, 0, 0);">entêtes de colonne pour un produit (et génère une erreur).</span></span></span></span></span>

<span style="color: rgb(0, 0, 0);"><span style="color: rgb(24, 139, 175);"><span style="color: rgb(0, 0, 0);">Vous aller cliquez sur **<span style="color: rgb(24, 139, 175);">lancer la simulation d'import</span>** vous permettant de déceler la moindre erreur qui serait présente dans l'import en cours.</span></span></span>

<span style="color: rgb(0, 0, 0);"><span style="color: rgb(24, 139, 175);"><span style="color: rgb(0, 0, 0);"><span style="color: rgb(24, 139, 175);">**Si des erreurs sont rencontrées**</span> vous allez en être averti par des messages d'erreur. Corrigez les éventuelles erreurs et recommencez jusqu'à ce qu'il n'y ait plus d'erreurs de détectées.  
</span></span></span>

<span style="color: rgb(0, 0, 0);"><span style="color: rgb(24, 139, 175);"><span style="color: rgb(0, 0, 0);">**<span style="color: rgb(24, 139, 175);">Si il </span>**</span></span></span><span style="color: rgb(0, 0, 0);"><span style="color: rgb(24, 139, 175);"><span style="color: rgb(0, 0, 0);">**<span style="color: rgb(24, 139, 175);">n'y a pas d'erreur</span>** là aussi vous en serez averti et vous pourrez cliquer sur <span style="color: rgb(24, 139, 175);">**Importer les données**</span> pour terminer l'étape 3.</span></span></span>

<div class="page-content clearfix" component="page-display" id="bkmrk-exemple-erreur-si-le" option:page-display:page-id="146"><div dir="auto"><table border="1" id="bkmrk-si-le-fournisseur-n%27" style="border-collapse: collapse; width: 100%; height: 368.75px;"><colgroup><col style="width: 33.9835%;"></col><col style="width: 22.8616%;"></col><col style="width: 25.8274%;"></col><col style="width: 17.3007%;"></col></colgroup><tbody><tr style="height: 46.3833px;"><td class="align-center" colspan="4" style="background-color: rgb(236, 240, 241); vertical-align: middle; height: 46.3833px;"><span style="color: rgb(0, 0, 0);">  
</span>**<span class="align-center" style="color: rgb(0, 0, 0);">Exemple erreur  
</span>**</td></tr><tr style="height: 63.1833px;"><td class="align-center" style="background-color: rgb(236, 240, 241); height: 63.1833px;"><span style="color: rgb(0, 0, 0);">**Si le fournisseur et référence fournisseur (produit) ne sont pas renseignés**</span>  
</td><td class="align-center" style="background-color: rgb(236, 240, 241); vertical-align: middle; height: 63.1833px;"><span style="color: rgb(0, 0, 0);">**Correction fournisseur** </span></td><td class="align-center" style="background-color: rgb(236, 240, 241); vertical-align: middle; height: 63.1833px;"><span style="color: rgb(0, 0, 0);">**Correction référence fournisseur (du produit)** </span></td><td style="background-color: rgb(236, 240, 241); vertical-align: middle; height: 63.1833px;">**<span style="color: rgb(0, 0, 0);">Si aucune erreur</span>** </td></tr><tr style="height: 259.183px;"><td style="height: 259.183px;"><span style="color: rgb(0, 0, 0);"><span style="color: rgb(24, 139, 175);">**[![image.png](https://doc.altairis.fr/uploads/images/gallery/2024-02/scaled-1680-/7xtimage.png)](https://doc.altairis.fr/uploads/images/gallery/2024-02/7xtimage.png)**</span></span>

</td><td style="height: 259.183px;"><span style="color: rgb(0, 0, 0);"><span style="color: rgb(24, 139, 175);">**Si oubli du fournisseur dans le CSV**</span>, corrigez le fichier et recommencer l'import</span>

<span style="color: rgb(0, 0, 0);">**<span style="color: rgb(24, 139, 175);">Si oubli d'indiquer le fournisseur depuis ces étapes</span>** d'import car non présent dans votre CSV, rajoutez le sur cette même étape et relancez</span>

</td><td style="height: 259.183px;"><span style="color: rgb(0, 0, 0);"><span style="color: rgb(24, 139, 175);"><span style="color: rgb(0, 0, 0);">**<span style="color: rgb(24, 139, 175);">Si l'erreur provient de votre CSV</span>** car manquant ou erroné, corriger votre fichier et recommencer les étapes</span>  
</span></span>

<span style="color: rgb(0, 0, 0);">**<span style="color: rgb(24, 139, 175);">L'erreur peut aussi venir des correspondances</span>** entre les champs de votre fichier et les champs cible de Dolibarr</span>

</td><td style="height: 259.183px;">[![image.png](https://doc.altairis.fr/uploads/images/gallery/2024-02/scaled-1680-/FgNimage.png)](https://doc.altairis.fr/uploads/images/gallery/2024-02/FgNimage.png)

<span style="color: rgb(0, 0, 0);"><span style="color: rgb(24, 139, 175);">  
</span></span></td></tr></tbody></table>

</div></div><p class="callout info"><span style="color: rgb(0, 0, 0);">**<span style="color: rgb(24, 139, 175);">Note :</span>** Les données sont stockées dans une table de la base de données spécialement prévue à cet effet pour que vous puissiez contrôler votre import avant une écriture définitive dans Dolibarr. Cette table reste alimentée par vos imports successifs (et garde la dernière mise à jour des prix).  
À cette étape donc, votre base produit n'a absolument pas été modifiée.</span></p>

#### **4.2.2- Valider le catalogue**

<span style="color: rgb(0, 0, 0);">Maintenant que vous avez fini les étapes de l'import </span><span style="color: rgb(0, 0, 0);">vous devez **<span style="color: rgb(24, 139, 175);">valider le catalogue</span>**. Cela vous permet de contrôler précisément les données avant l'import définitif dans Dolibarr qui rendra vos produits disponibles.</span>

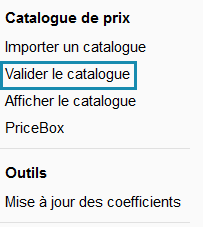
<span style="color: rgb(0, 0, 0);">Pour cela cliquez à gauche sur **<span style="color: rgb(24, 139, 175);">Valider le catalogue</span>**.</span>

[![menu de gauche - Copie.png](https://doc.altairis.fr/uploads/images/gallery/2024-02/scaled-1680-/menu-de-gauche-copie.png)](https://doc.altairis.fr/uploads/images/gallery/2024-02/menu-de-gauche-copie.png)

<p class="callout info"><span style="color: rgb(0, 0, 0);">**<span style="color: rgb(24, 139, 175);">Note :</span>** Si pour une raison quelconque vous devez arrêter votre progression, prenez en compte que votre avancement sera gardé en mémoire vous pourrez toujours revenir dessus.</span></p>

##### **<span style="color: rgb(0, 0, 0);">Explication de l'écran</span>**

##### <span style="color: rgb(0, 0, 0);">Les éléments visuels  
</span>

1. 1. 1. 1. 1. <span style="color: rgb(0, 0, 0);">choix du nombre d'éléments à afficher  
                    </span>
                2. <span style="color: rgb(0, 0, 0);">bouton d'action</span>
                3. <span style="color: rgb(0, 0, 0);">nom du champ avec les données par colonne  
                    </span>
                4. <span style="color: rgb(0, 0, 0);">la description de la catégorie si il y en a une</span>
                5. <span style="color: rgb(0, 0, 0);">les boutons créent catégorie et supprimé catégorie</span>

##### <span style="color: rgb(0, 0, 0);">Les boutons d'action</span>

<span style="color: rgb(0, 0, 0);">Vous permettant de faire les actions :  
</span>

- - - - - <span style="color: rgb(0, 0, 0);">copier (pour coller sur n’importe quel fichier de votre choix l'intégralité du tableau)</span>
                - <span style="color: rgb(0, 0, 0);">créer un fichier CSV  
                    </span>
                - <span style="color: rgb(0, 0, 0);">imprimer</span><span style="color: rgb(0, 0, 0);"> le </span><span style="color: rgb(0, 0, 0);">tableau</span><span style="color: rgb(0, 0, 0);"> dans son intégralité</span>

<span style="color: rgb(0, 0, 0);">Les éléments de sélection suivants sont là pour vous aidez visuellement à vous repérer, vous pouvez aussi cliquer directement sur les lignes que vous souhaitez voir en surbrillance ou choisir une action et cliquez ensuite :</span>

- - - - - <span style="color: rgb(0, 0, 0);">sélection</span>
                - <span style="color: rgb(0, 0, 0);">sélection seule</span>
                - <span style="color: rgb(0, 0, 0);">sélectionner tout</span>
                - <span style="color: rgb(0, 0, 0);">désélectionner tout</span>
                - <span style="color: rgb(0, 0, 0);">sélectionner telle ligne</span>
                - <span style="color: rgb(0, 0, 0);">sélectionner telle colonne</span>
                - <span style="color: rgb(0, 0, 0);">sélectionner telles cellules</span>

##### **<span style="color: rgb(0, 0, 0);">C</span><span style="color: rgb(0, 0, 0);">réation catégorie et produit  
</span>**

##### <span style="color: rgb(0, 0, 0);">Création catégorie</span>

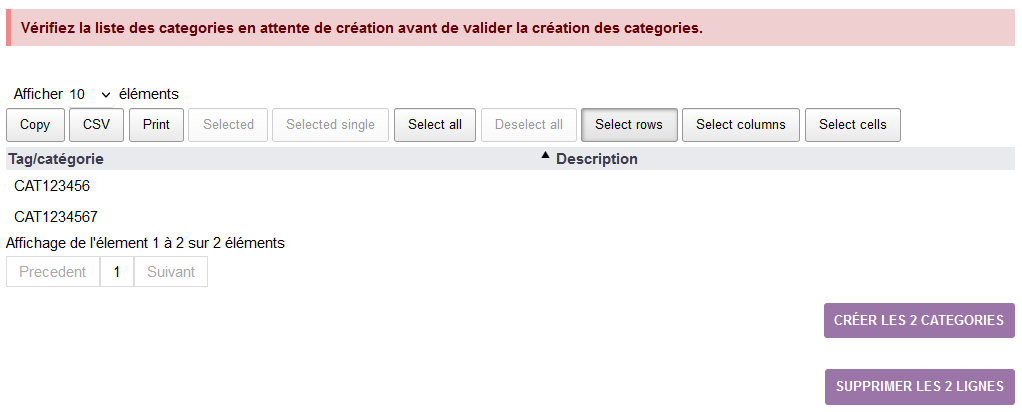
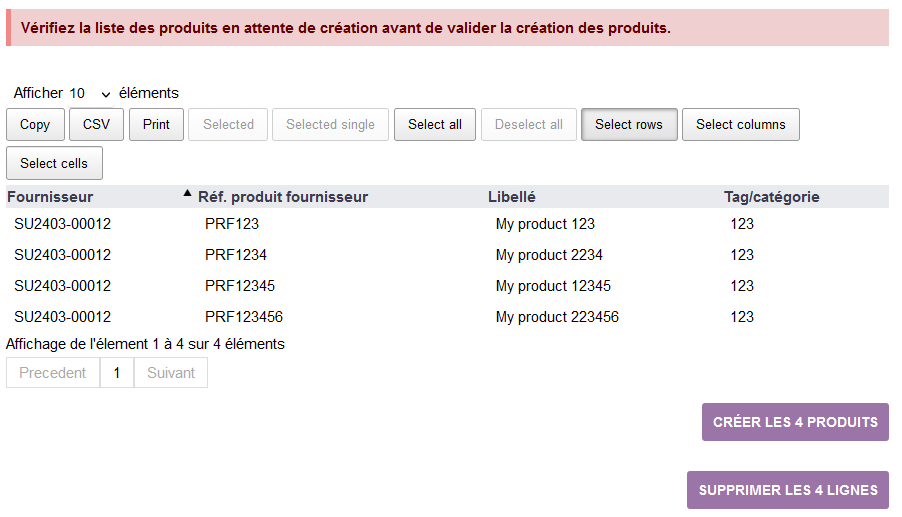
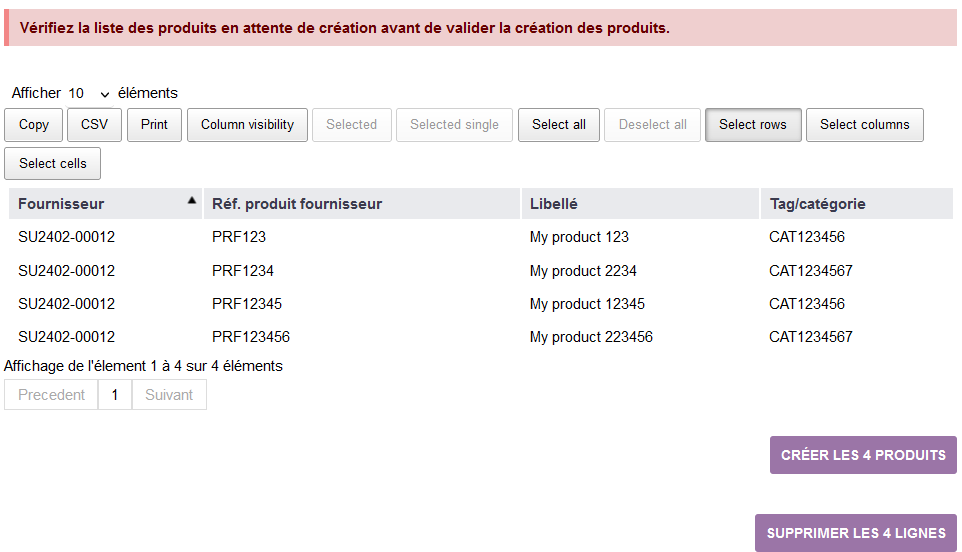
<span style="color: rgb(0, 0, 0);">Il s'agit ici de **<span style="color: rgb(24, 139, 175);">valider la création ou la suppression</span>** (qui serait potentiellement une erreur non vue lors de votre vérification de votre fichier CSV) des champs concernant **<span style="color: rgb(24, 139, 175);">la catégorie </span>**de votre fichier CSV.</span>

<span style="color: rgb(0, 0, 0);">Faites la création et ou la suppression catégorie en cliquant sur **<span style="color: rgb(24, 139, 175);">Créer</span>** ou**<span style="color: rgb(24, 139, 175);"> Supprimer catégorie</span>** et de **<span style="color: rgb(24, 139, 175);">confirmer votre choix</span>**.</span>

<span style="color: rgb(0, 0, 0);">Les messages que vous verrez apparaître à la fin de cette manipulation selon la configuration de votre fichier CSV et de vos choix lors de l'import et de la validation de la catégorie sont les suivants :</span>

- - - - - <span style="color: rgb(0, 0, 0);">Les lignes sans catégories ont été supprimées de l'import</span>
                - <span style="color: rgb(0, 0, 0);">Les lignes ont été affectées à la catégorie \[code catégorie\]</span>
                - <span style="color: rgb(0, 0, 0);">Les lignes sans catégories ont été acceptées</span>
                - <span style="color: rgb(0, 0, 0);">Les (x) catégories ont été créées</span>
                - <span style="color: rgb(0, 0, 0);">Toutes les lignes ont été supprimées</span>

<p class="callout info"><span style="color: rgb(0, 0, 0);">**<span style="color: rgb(24, 139, 175);">Note :</span>** Vous ne passerez pas par cet écran **<span style="color: rgb(24, 139, 175);">si vous avez défini une catégorie lors de l'import</span>** via la liste déroulante.  
**<span style="color: rgb(24, 139, 175);">Si vous n'avez pas affecté de catégorie à vos produits</span>** dans votre fichier CSV ni pendant les étapes de votre import.</span></p>

<table border="1" id="bkmrk-exemple-d%27%C3%A9cran-pour" style="border-collapse: collapse; width: 100%; height: 1504.6px;"><colgroup><col style="width: 100%;"></col></colgroup><tbody><tr style="height: 29.5833px;"><td class="align-center" style="background-color: rgb(236, 240, 241); vertical-align: middle; height: 29.5833px;">**<span class="align-center" style="color: rgb(0, 0, 0);">Exemple d'écran pour la validation de la catégorie  
</span>**</td></tr><tr style="height: 29.5833px;"><td class="align-center" style="background-color: rgb(236, 240, 241); vertical-align: middle; height: 29.5833px;">**<span class="align-center" style="color: rgb(0, 0, 0);">Vous avez indiqué <span style="color: rgb(24, 139, 175);">une nouvelle catégorie dans votre fichier CSV :</span></span>**</td></tr><tr style="height: 355.533px;"><td class="align-center" style="vertical-align: middle; height: 355.533px;"><span class="align-center" style="color: rgb(0, 0, 0);">Création de la ou les catégories</span>  
[![image.png](https://doc.altairis.fr/uploads/images/gallery/2024-03/scaled-1680-/ifKimage.png)](https://doc.altairis.fr/uploads/images/gallery/2024-03/ifKimage.png)

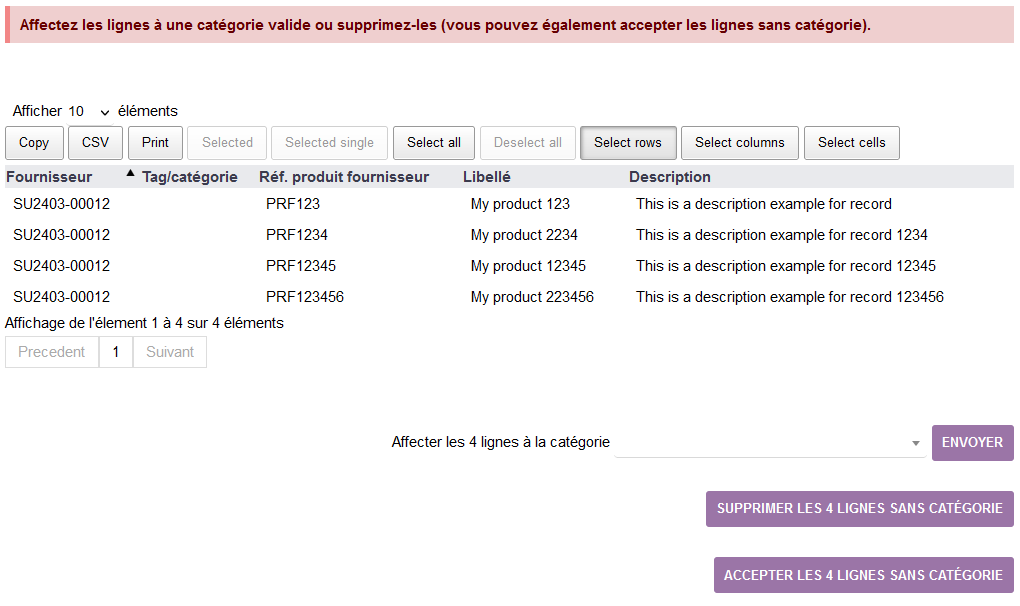
</td></tr><tr style="height: 29.5833px;"><td class="align-center" style="vertical-align: middle; background-color: rgb(236, 240, 241); height: 29.5833px;">**<span class="align-center" style="color: rgb(0, 0, 0);">Des produits <span style="color: rgb(24, 139, 175);">non pas de catégorie dans votre fichier CSV <span style="color: rgb(0, 0, 0);"> </span></span></span>**<span class="align-center" style="color: rgb(0, 0, 0);"><span style="color: rgb(24, 139, 175);"><span style="color: rgb(0, 0, 0);">n'y pendant </span></span></span>**<span class="align-center" style="color: rgb(0, 0, 0);"><span style="color: rgb(24, 139, 175);"><span style="color: rgb(0, 0, 0);"><span style="color: rgb(24, 139, 175);">les étapes de votre import :</span></span></span></span><span class="align-center" style="color: rgb(0, 0, 0);">  
</span>**</td></tr><tr style="height: 534.867px;"><td class="align-center" style="vertical-align: middle; height: 534.867px;"><span class="align-center" style="color: rgb(0, 0, 0);">Vous pouvez toujours choisir de ne pas avoir de catégorie ;   
dans ce cas v<span style="color: rgb(0, 0, 0);">ous aurez directement l'écran de la création des produits</span></span>**<span class="align-center" style="color: rgb(0, 0, 0);">.</span>**

[![image.png](https://doc.altairis.fr/uploads/images/gallery/2024-03/scaled-1680-/Hquimage.png)](https://doc.altairis.fr/uploads/images/gallery/2024-03/Hquimage.png)

</td></tr><tr style="height: 29.5833px;"><td class="align-center" style="vertical-align: middle; background-color: rgb(236, 240, 241); height: 29.5833px;">**<span class="align-center" style="color: rgb(0, 0, 0);">Vous avez indiqué <span style="color: rgb(24, 139, 175);">une nouvelle catégorie lors de l'import  
</span></span>**</td></tr><tr style="height: 495.867px;"><td class="align-center" style="height: 495.867px;"><span style="color: rgb(0, 0, 0);">Vous aurez directement l'écran de la création des produits</span>

[![image.png](https://doc.altairis.fr/uploads/images/gallery/2024-03/scaled-1680-/z9timage.png)](https://doc.altairis.fr/uploads/images/gallery/2024-03/z9timage.png)

</td></tr></tbody></table>

##### <span style="color: rgb(0, 0, 0);">Création produit</span>

<span style="color: rgb(0, 0, 0);">Il s'agit ici de **<span style="color: rgb(24, 139, 175);">valider la création ou la suppression</span>** (qui serait potentiellement une erreur non vue lors de votre vérification de votre fichier CSV) des champs concernant **<span style="color: rgb(24, 139, 175);">l</span><span style="color: rgb(24, 139, 175);">e produit fournisseur </span>**de votre fichier CSV.</span>

<span style="color: rgb(0, 0, 0);">Faites la création et ou la suppression produit en cliquant sur **<span style="color: rgb(24, 139, 175);">Créer</span>** ou**<span style="color: rgb(24, 139, 175);"> Supprimer produit</span>**<span style="color: rgb(24, 139, 175);"> <span style="color: rgb(0, 0, 0);">et de **<span style="color: rgb(24, 139, 175);">confirmer votre choix</span>**.</span></span>  
</span>

<span style="color: rgb(0, 0, 0);">Les messages que vous verrez apparaître à la fin de cette manipulation selon la configuration de votre fichier CSV et de vos choix lors de l'import et de la validation produit fournisseur sont les suivants :</span>

- - - - - <span style="color: rgb(0, 0, 0);">(x) **<span style="color: rgb(24, 139, 175);">produits </span>**ont été créés</span>
                - <span style="color: rgb(0, 0, 0);">Toutes les lignes ont été supprimées</span>

[![image.png](https://doc.altairis.fr/uploads/images/gallery/2024-02/scaled-1680-/WI7image.png)](https://doc.altairis.fr/uploads/images/gallery/2024-02/WI7image.png)

<p class="callout info"><span style="color: rgb(0, 0, 0);">**<span style="color: rgb(24, 139, 175);">Note :</span>** À partir du moment où vous créez les produits, ils sont créés dans votre base produits / services. Ils seront hors vente et hors achat, sans éléments de prix, tant que vous n'avez pas validé les prix.</span></p>


#### **<span style="color: rgb(0, 0, 0);">4.2.3-</span><span style="color: rgb(0, 0, 0);"> Produits qui ne sont plus au catalogue  
</span>**

<span style="color: rgb(0, 0, 0);">Vous pouvez gérer les nouveaux produits et les produits supprimés du catalogue, même si vous importez plusieurs fournisseurs d'un coup.</span>

<p class="callout warning">ATTENTION  
Le seul cas qui n'est pas géré par cette fonctionnalité concerne le cas où vous supprimez totalement un fournisseur de vos listes.  
  
En effet, le module s'appuie sur les codes fournisseurs pour parcourir la base de données et vous dire si des produits de ces fournisseurs sont présents dans votre Dolibarr, mais pas dans votre liste nouvellement importée. À des fins d'allègement de traitement (pour le programme et pour vous !), le module ne va donc pas s'occuper de vous lister tous les produits de tous les fournisseurs qui ne seraient pas dans votre import !  
  
De ce fait, il ne sera pas possible de mettre en évidence les produits d'un fournisseur qui aurait « disparu » de votre liste. Vous devrez traiter ce cas manuellement.</p>

##### <span style="color: rgb(0, 0, 0);">Fonctionnement :</span>

<span style="color: rgb(0, 0, 0);">Le module va détecter les nouveaux produits et vous demander d'en valider la création, comme vu ci- dessus. Il va également  détecter, sur la base des références fournisseur, si des produits existant dans votre base Dolibarr ne sont plus présents dans le nouvel import. Cela peut supposer que ces produits ne sont plus distribués, et vous devez les mettre hors achat, voire hors vente si vous ne les avez plus en stock. En tout état de cause il n'y a pas d'automatisation : c'est à vous de décider.</span>

<span style="color: rgb(0, 0, 0);">Le module de gestion des prix vous présente la liste de ces produits pour vous permettre de gérer les cas à la main et selon votre situation. La liste présentée propose les éléments suivants pour vous y retrouver :</span>

<span style="color: rgb(0, 0, 0);">• Gestion des prix et catalogues fournisseurs  
• Nom du fournisseur  
• Réf. Produit fournisseur  
• Référence interne du produit (la référence Dolibarr pour ce produit)  
• Libellé  
• Catégorie si existante</span>

#### **<span style="color: rgb(0, 0, 0);">4.2.4-</span><span style="color: rgb(0, 0, 0);"> Export du tableau « Produit qui ne sont plus au catalogue »  
</span>**

<span style="color: rgb(0, 0, 0);">Depuis cette nouvelle version du module, vous pouvez exporter directement vos tableaux au format de votre choix avec l'un des boutons d'export présents au dessus du tableau :</span>

<span style="color: rgb(0, 0, 0);">• copier dans votre presse-papier  
• Excel : sortie d'un fichier au format csv  
• PDF : sortie d'un fichier pdf  
• Print : prépare dans le navigateur les informations pour impression. Utiliser ensuite les  
fonctions d'impression du navigateur.</span>

<span style="color: rgb(0, 0, 0);">À partir de ces informations, vous devez faire à la main les opérations de mise hors achat des produits (sauf à les trouver ailleurs, ils ne sont plus disponibles chez votre fournisseur) voire hors vente selon que vous les avez en stock ou pas.  
Vous pouvez bien sûr terminer votre validation des prix avant de réaliser ces opérations manuelles de correction de votre base de données produits.</span>

<span style="color: rgb(0, 0, 0);">Si vous ne faites pas ces opérations, les produits listés ici seront toujours présents dans votre base produits de Dolibarr et pourront être normalement utilisés ! Ceci pouvant vous conduire à des difficultés, soyez vigilant et ne négligez pas cette étape.</span>

<span style="color: rgb(0, 0, 0);">Dans le futur, le module devrait permettre de cliquer sur les références pour accéder directement aux fiches produit concernées.</span>

<span style="color: rgb(0, 0, 0);">La désactivation directe des produits n'est pour l'heure pas envisagée, car cela dépend beaucoup de l'activité de chacun : on peut avoir d'autres fournisseurs pour ce produit, ou l'avoir en stock et continuer à le vendre. Encore une fois, c'est à vous de décider.</span>


#### **<span style="color: rgb(0, 0, 0);">4.2.5-</span><span style="color: rgb(0, 0, 0);"> Validation des prix</span>**

<span style="color: rgb(0, 0, 0);">Il s'agit ici de **<span style="color: rgb(24, 139, 175);">valider la création ou la suppression</span>** (qui serait potentiellement une erreur non vue lors de votre vérification de votre fichier CSV) **<span style="color: rgb(24, 139, 175);">des prix </span>**de votre fichier CSV.</span>

<span style="color: rgb(0, 0, 0);">Les **<span style="color: rgb(24, 139, 175);">lignes éventuellement supprimées en amont </span>**ne seront pas présentes sur cet écran.</span>

<span style="color: rgb(0, 0, 0);">Sur cet écran il à un <span style="color: rgb(24, 139, 175);"><span style="color: rgb(0, 0, 0);">champ</span> </span>**<span style="color: rgb(24, 139, 175);">Rechercher </span>**qui apparaît à gauche des boutons d'actions, il vous permet de rechercher dans toutes vos ligne par :</span>

- - - <span style="color: rgb(0, 0, 0);">Réf.</span>
        - <span style="color: rgb(0, 0, 0);">Libellé</span>
        - <span style="color: rgb(0, 0, 0);">Description</span>
        - <span style="color: rgb(0, 0, 0);">Fournisseur</span>
        - <span style="color: rgb(0, 0, 0);">Nom</span>
        - <span style="color: rgb(0, 0, 0);">Réf.produit fournisseur</span>
        - <span style="color: rgb(0, 0, 0);">Tag / Catégorie</span>

<span style="color: rgb(0, 0, 0);">Tapez une référence produit et attendez un léger moment pour voir votre recherche apparaître automatiquement sans autre action de votre part.</span>

<span style="color: rgb(0, 0, 0);">Il vous reste plus qu'à cliquer sur **<span style="color: rgb(24, 139, 175);">Valider </span>**ou **<span style="color: rgb(24, 139, 175);">Supprimer </span>**les prix en bas à droite de votre écran et de **<span style="color: rgb(24, 139, 175);">confirmer votre choix</span>**.</span>

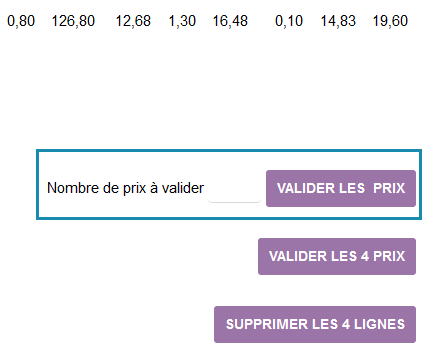
<span style="color: rgb(0, 0, 0);">Si votre **<span style="color: rgb(24, 139, 175);">fichier et volumineux</span>** vous pouvez **<span style="color: rgb(24, 139, 175);">utiliser </span>**l'option "**<span style="color: rgb(24, 139, 175);">Nombre de prix à valider</span>**" directement disponible sur votre écran. **<span style="color: rgb(24, 139, 175);">Par exemple</span>** : votre fichier comporte 122 lignes, notez 61 puis cliquez sur Valider les prix, les soixante et une premières lignes seront validées. Notez de nouveau 61 puis validez de nouveau et ce sont les lignes qui sont après les soixante et une premières lignes validées qui seront validées est ainsi de suite.</span>

[![bouton validé prix.png](https://doc.altairis.fr/uploads/images/gallery/2024-03/scaled-1680-/bouton-valide-prix.png)](https://doc.altairis.fr/uploads/images/gallery/2024-03/bouton-valide-prix.png)

<span style="color: rgb(0, 0, 0);">Une fois votre choix confirmé vous verrez apparaître l'un des messages suivants :</span>

- - <span style="color: rgb(0, 0, 0);">(x) prix ont été créés</span>
    - <span style="color: rgb(0, 0, 0);">(x) prix ont été modifiés (dans le cas d'une mise à jour)</span>
    - <span style="color: rgb(0, 0, 0);">Toutes les lignes ont été supprimées</span>

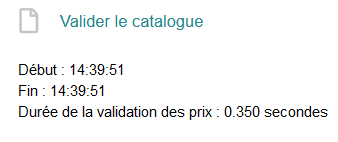
<span style="color: rgb(0, 0, 0);">Une fois les prix validés vous verrez ce message d'information apparaître :</span>

[![image.png](https://doc.altairis.fr/uploads/images/gallery/2024-03/scaled-1680-/QCiimage.png)](https://doc.altairis.fr/uploads/images/gallery/2024-03/QCiimage.png)

<p class="callout info"><span style="color: rgb(0, 0, 0);">**<span style="color: rgb(24, 139, 175);"><span style="color: rgb(0, 0, 0);"><span style="color: rgb(24, 139, 175);">Note :</span></span> La validation du catalogue peut devenir très longue</span>** si vous avez **<span style="color: rgb(24, 139, 175);">un fichier CSV trop volumineux</span>** (beaucoup de lignes de prix à importer,  beaucoup de niveaux de prix) dans le même fichier CSV.  
Il est donc**<span style="color: rgb(24, 139, 175);"> préférable de découper votre fichier CSV en plusieurs imports</span>** distincts.</span></p>


#### **<span style="color: rgb(0, 0, 0);">4.2.6- Interruption volontaire de la validation </span>**

<span style="color: rgb(0, 0, 0);">Si vous remarquez des erreurs à corriger lors de l'une des étapes de la validation du catalogue, vous pouvez interrompre l'opération pour corriger votre fichier d'import et recommencer à partir de l'étape 1 de l'import. Toutefois, il est **<span style="color: rgb(24, 139, 175);">impératif</span>** d'<span style="color: rgb(24, 139, 175);">**interrompre proprement**</span> la procédure en vidant totalement les informations enregistrées à cette étape de validation. </span>


##### <span style="color: rgb(0, 0, 0);">**IMPORTANT**</span>

<p class="callout warning"><span style="color: rgb(0, 0, 0);">Supprimez systématiquement les lignes qui vous sont proposées à la validation jusqu'à ce qu'il n'y ai plus rien à valider. Si vous avez déjà créé les produits ou en cas de mauvaise interruption de la procédure de mise à jour via la gestion des prix; vous allez avoir des produits dans Dolibarr hors vente et hors achat, qui n'ont pas d'information de prix et qu'il vous faudra aller supprimer un par un (cette étape peut vite devenir longue en fonction du nombre important de produit qui seront créés).  
  
Et si vous oubliez de le faire, le prochain import vous remontera des erreurs en vous disant que les références que vous importez existent déjà (ce sont ces produits hors vente et hors achat sans informations de prix). Vous gagnerez donc un temps précieux en interrompant proprement la procédure d'import.</span></p>

<div class="page-content clearfix" component="page-display" id="bkmrk--13" option:page-display:page-id="142"></div>